-
3-minute read
-
14th November 2016
Using “Styles” to Add Headings in Microsoft Word
Whether you’re working on a college paper or a business report, presentation is crucial. Adding headings to a document, for example, will make it easier to read and increase its visual impact.
Luckily, adding headings to a document in Microsoft Word is simple when you use the “Styles” function.
What are “Styles”?
“Styles” in Microsoft Word are options that you can use to ensure your document is consistently formatted. They can be accessed via the “Home” tab in Word 2007 or later.

If you want to modify the styles available here, you can click on the little arrow in the bottom right of the “Styles” window to open a new menu with additional options.
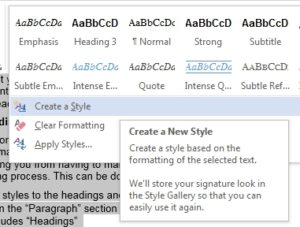
You can customize “Styles” by right-clicking an existing style and selecting “Modify.” Alternatively, you can create your own “Styles” by clicking “New Style” in the menu.
Adding Headings
Among the available “Styles,” you’ll see that some are labelled “Heading”: e.g., “Heading 1,” “Heading 2,” “Heading 3,” etc.
These can be applied by:
Find this useful?
Subscribe to our newsletter and get writing tips from our editors straight to your inbox.
Subscribe to Beyond the Margins and get your monthly fix of editorial strategy, workflow tips, and real-world examples from content leaders.
- Selecting the text that you want to use as a heading
- Going to the “Styles” section in the “Home” tab
- Clicking the appropriate “Heading” style in the “Styles” menu
If the “Heading” you want to use isn’t visible in this menu, you should:
- Click the arrow in the bottom right to open the sidebar “Styles” menu
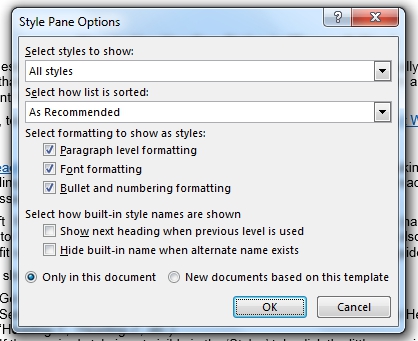
- If the required “Heading” isn’t showing up, click on “Options…”
- In the window that opens, select “All Styles” under “Select Styles to Show” and click “OK”
“Style” options. - Once the correct “Heading” is showing, apply it as described above
You can modify these “Styles” to suit your requirements if the default options don’t appeal. It’s a good idea to use slightly different font sizes or styles for different levels of heading so that your reader can tell, for instance, main headings from subheadings.
Adding Numbered Headings
Microsoft Word also offers the option of adding numbered headings
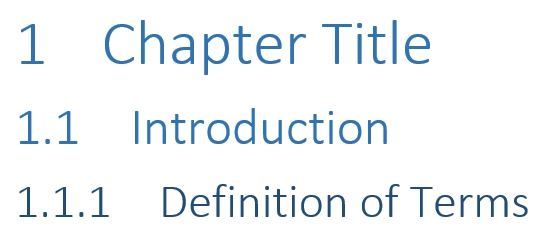
This involves using the “Multilevel List” function to automatically apply consistent numbering to headings and subheadings in your document, saving you from having to manually adjust numbering if you add or remove headings during the editing process. To do this:
- Apply different “Heading” styles to the headings and subheadings in your document
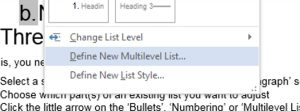
- Click on “Multilevel List” in the “Paragraph” section of the “Home” tab
- Select a list style that includes “Headings”
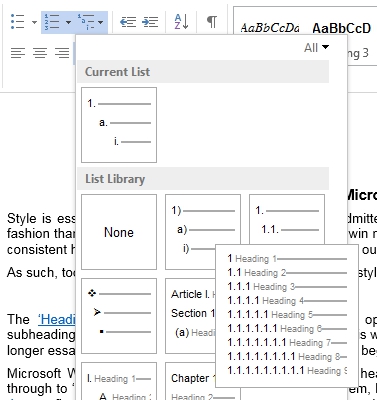
The “Multilevel List” menu.
This will apply different numbering styles to the various heading levels in your document. You can create new numbering styles using the “Define New Multilevel List” option in this menu.