-
4-minute read
-
22nd August 2026
How To Use the Ruler Tool in Microsoft Word
The ruler tool in Microsoft Word provides a straightforward way to align different parts of your document. It also allows you to adjust margins and indents quickly. Whether you’re formatting reports, proposals, or internal communications, the ruler helps you maintain a consistent layout across every page. Here’s how it works.
Display the Ruler in Microsoft Word
To show the horizontal and vertical rulers in Microsoft Word:
● Go to the View tab on the main ribbon
● Click the Ruler checkbox
You will now see rulers on the top and left margins in the Print Layout view. You can then change the unit of measurement to suit your requirements.

Adjust Margins Using the Ruler
On the ruler, the gray areas represent the margins of your document. The white space between them is where your text will appear.
To adjust a margin using the ruler tool:
● Hover the cursor at the edge of the margin you want to adjust
● When the double-headed arrow cursor appears, click and drag to increase or decrease the margin size
This method can be inexact. If your document requires precise margin settings (for example, to meet brand guidelines or submission requirements), use the standard margin options in Word’s Page Layout settings instead.
Use Indentation Tabs on the Ruler
You should also see some small white shapes at the edges of the ruler. These let you quickly adjust indentations in a document. Place the cursor in the text you want to indent, then drag the relevant shape on the ruler.
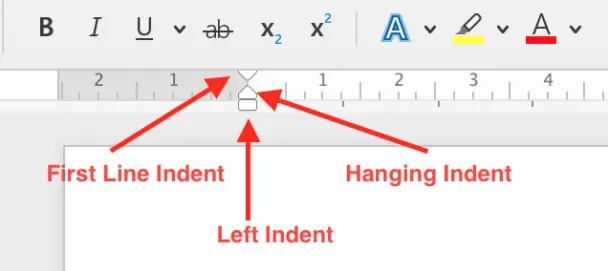
The key is to select the correct tab. Here’s what each one does:
● Left indent: drag the rectangle shape on the ruler to move all the indent tabs at once. This adjusts all the text in the paragraph where you place the cursor.
● First line indent: drag the downward-pointing arrow at the top of the ruler. This indents only the first line in the selected paragraph.
● Hanging indent: select and move the triangle just above the rectangle shape (this will also move the left indent tab). This indents every line in the selected paragraph, except the first. Hanging indents are especially useful when formatting reference lists or bibliographies.
● Right indent: click and drag the arrow on the right side of the ruler. This indents text from the right margin.
Find this useful?
Subscribe to our newsletter and get writing tips from our editors straight to your inbox.
Subscribe to Beyond the Margins and get your monthly fix of editorial strategy, workflow tips, and real-world examples from content leaders.
If you’re unsure which tab is which, hover the cursor over any of the shapes on the ruler. Its name will appear, helping you pick the right one.
As with margins, indents via the ruler can be imprecise. To ensure consistency across longer documents, verify the size of your indents via the paragraph menus.
Toggle the Vertical Ruler
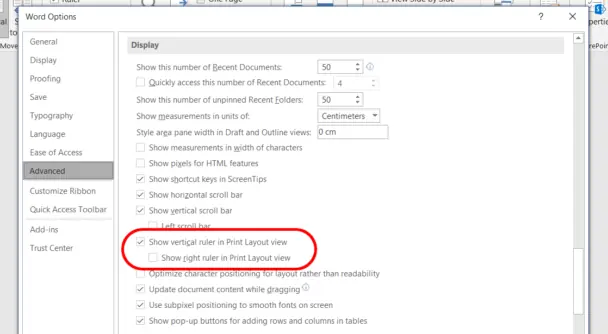
If the vertical ruler doesn’t display alongside the horizontal one, you may need to enable it through the options menu.
In Word for Windows:
● Go to File > Options > Advanced, and scroll down to Display
● Click Show vertical ruler in the Print Layout view checkbox (you can also choose to display this ruler on the right margin)
● Click OK to accept the change
In Word for Mac:
● Go to Word > Preferences via the toolbar
● Select View under Authoring and Proofing Tools
● Check Vertical ruler under Show Window Elements
● Close the preferences pane to save your changes
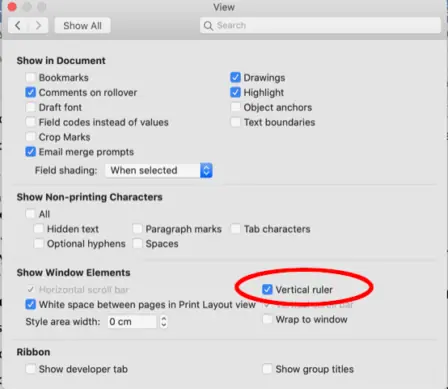
You should now see the vertical ruler running down the left side of your document.
Apply the Ruler for Consistent Document Formatting
The ruler is a small tool that makes a big difference in how your documents look. Consistent margins and indentation signal professionalism, whether you’re preparing client-facing proposals, internal reports, or marketing collateral. Pair the ruler with Word’s built-in paragraph and page layout settings to maintain uniform formatting across your team’s files.
Expert Formatting
For documents that need to meet strict formatting standards, consider going one step further. Our formatting services ensure every margin, indent, and layout element is precise and ready for publication. Simply select the “Formatting” option when you upload a document for proofreading, and let us know which formatting to apply.