


The “Caption” options in Microsoft Word allow you to label images, diagrams, charts, illustrations and figures so your reader can quickly identify what they mean, as well as enabling use of the “dynamic” list functions offered by Microsoft Word.
As such, using captions can help make sure your written work is clear, professionally presented and easy to follow. None of this is much good unless you know how to use captions, though, so strap in and we’ll run you through the basics.
Adding Captions
Adding a basic caption to an existing image/chart in your document is pleasingly straightforward:
- Right click on your image and select “Insert Caption…” from the menu.
- In the pop-up window, choose how you want to label the image (e.g., Figure, Table, etc.) and whether you want it to appear above or below the image.
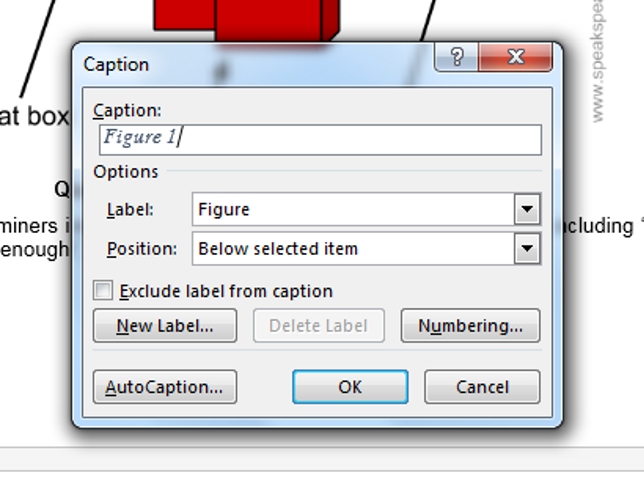
- Add text that describes the image (e.g., “Figure 1: Experimental Apparatus”) and click “OK.”


This will make a caption appear in the chosen position.
If you want to add a caption to something in the document other than an embedded image, position the cursor where you want to caption to appear and either:
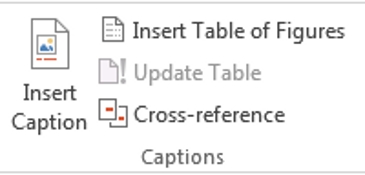
- Go to the “References” tab and select “Insert Caption,” then follow the instructions above.
- Select the “Caption” option from the Styles menu and type; this creates captions without a “Label,” giving you more control over how they’re presented.
Setting Caption Style
Microsoft Word comes with a default “Caption” style, but you can modify this through the “Styles” menu. If you want to set your own caption style, simply:
Find this useful?
Subscribe to our newsletter and get writing tips from our editors straight to your inbox.
- Click on the arrow in the bottom right of the “Styles” menu on the “Home” tab to open the “Styles” sidebar.
- Right click on “Caption” and select “Modify…” to open a new window.
- In the pop up window, select the font/formatting options you require for your captions.
If you want to use different caption styles for different captions or in different parts of your document, you can do this by:
- Clicking on the “New Style” button on the “Styles” sidebar.
- Selecting “Caption” under the “Style Based On” option.
- Choosing a name for your new style (e.g., “Caption 2”) and selecting the font/formatting options required.
Using Captions
As well as labeling your charts and images, using the “Caption” options in Microsoft Word means you can add a dynamic list of charts/figures to your document.
This is quicker than creating a list manually, and you can update dynamic lists at the touch of a button, thereby ensuring they remain accurate even if you amend captions later on. To use this function:
- Position the cursor where you want the list to appear.
- Go to the “References” tab and select “Insert Table of Figures”.
- Choose the caption label type (e.g., Figure, Table, None).

- Click “OK.”
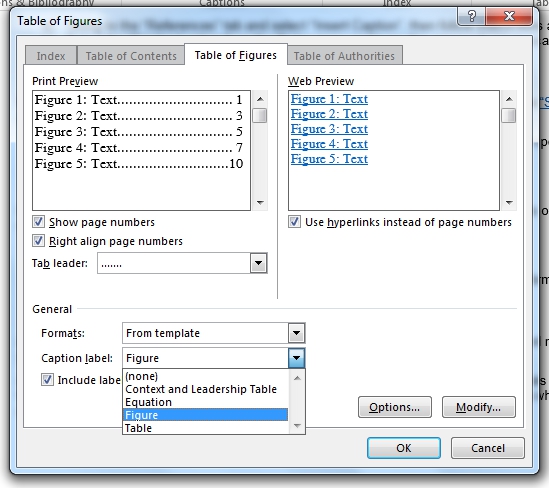
If you’re using more than one caption style, you can even create separate lists for different label types.