-
3-minute read
-
13th July 2018
Microsoft Word Tips: Adding Chapter Headers
Breaking up a longer document, such as a dissertation or manuscript, into chapters will make it much easier to read. And if you do this, adding chapter headers will help your reader navigate the document quickly and easily. But how does this work in Microsoft Word? Let us explain.
Chapter Headers in Microsoft Word
Adding chapter headers to a Microsoft Word document requires three things:
- Using a Heading style for your chapter headings
- Adding section breaks between chapters
- Generating the chapter headers
This might seem complex, but each step is simple. Read on to find out more.
Step One: Applying Heading Styles
The Heading styles in Word are used for headings and subheadings. Chapter titles are the main headings in a document, so they would usually be formatted with Heading 1. Whichever style you use, though, to prepare for applying chapter headers you should:
- Select a style and customize it as required
- Go through your work applying the chosen style to all chapter headings

Make sure to only use this style for chapter titles (you can use the other Heading styles for subheadings within chapters). This will let Microsoft Word tell the chapter titles apart from other text.
Step Two: Adding Section Breaks
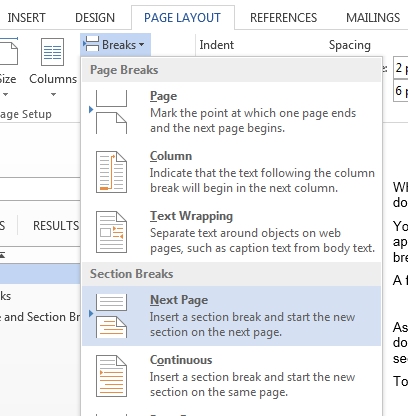
Next, we need to add section breaks between chapters. Usually, you will want each chapter to start on a new page. You can do this throughout your document as follows:
Find this useful?
Subscribe to our newsletter and get writing tips from our editors straight to your inbox.
Subscribe to Beyond the Margins and get your monthly fix of editorial strategy, workflow tips, and real-world examples from content leaders.
- Find the first chapter title
- Place the cursor before the heading
- Go to Layout > Page Setup on the main ribbon
- Click Breaks and select Next Page from the dropdown menu
- Repeat for each chapter in the document

Doing this will tell Microsoft Word where each chapter starts and ends.
Step Three: Creating Chapter Headers
All we need to do now is tell Microsoft Word what goes in each header. To do this, we first need to make sure that the headers in each section are separated from one another. To do this:
- Go to the first chapter in your document
- Open the header by going to Insert > Header & Footer > Header > Edit Header on the ribbon
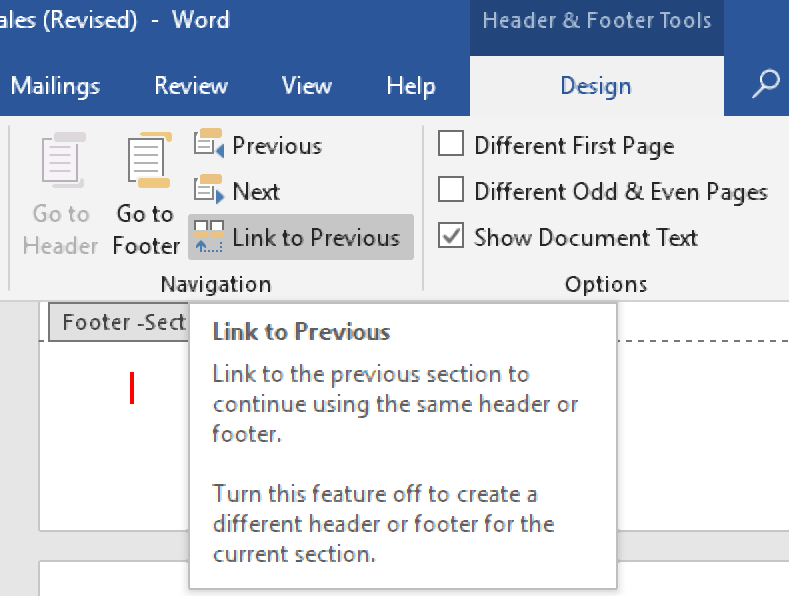
- With the header selected, go to Design > Navigation
- Deselect Link to Previous
- Repeat for each section of the document

And finally, to create the chapter headers themselves, all you need to do is:
- Open the header in the first chapter
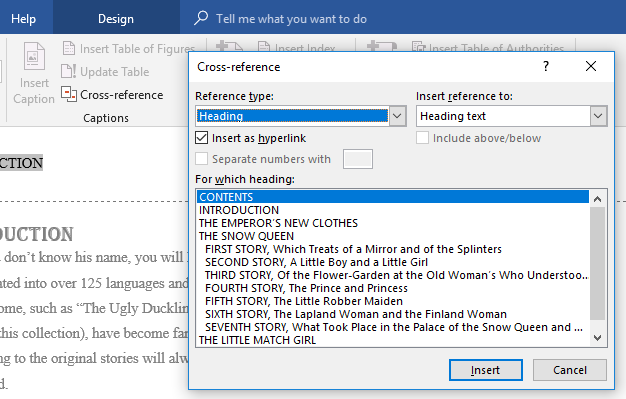
- Go to References > Captions > Cross-reference
- Select Heading from the menu as your reference type
- Pick the relevant chapter title and click Insert
- Repeat for each chapter of your document

This will insert the text formatted with the selected Heading style at the top of each page in each section. You can also apply the same header throughout multiple sections by leaving the Link to Previous option selected for each section after the first.
If you later update your chapter titles, don’t forget to update your chapter headers! Getting your work proofread is a great way of making sure you don’t miss issues like this, so get in touch today.


