


Among other formatting options, Microsoft Word lets you adjust the page layout of a document. Two key factors in this respect are the margins and page orientation. Both of these have a big effect on how a document looks, so check out our guide below to find out how they work.
Margins in Microsoft Word
The margins in a document are the spaces at the edge of each page. You may need to change these to leave space to make notes (e.g., in a college paper). Or you may simply want to control where text appears on the page. In either case, you can adjust the margins in a document by:
- Going to Layout > Page Setup on the main ribbon.
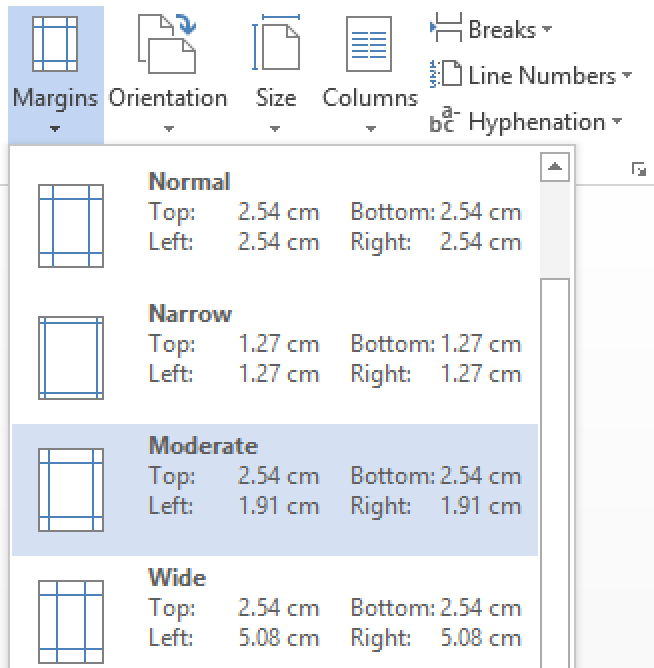
- Clicking Margins and then either:
- Selecting on of the preset margin options.
- Clicking Custom Margins… to open the Page Setup menu and setting the size of the top, bottom, left, and right margins as required.

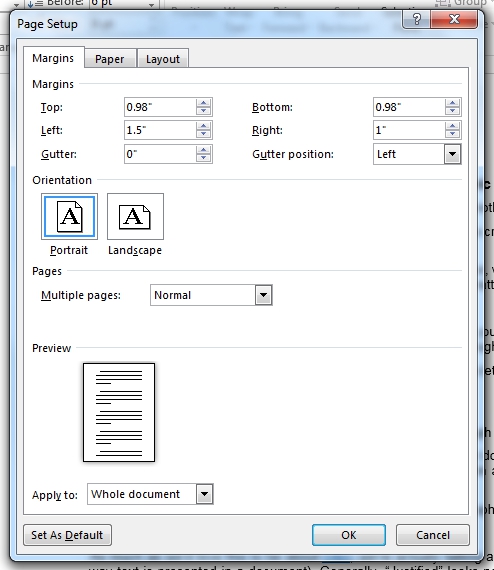
In Microsoft Word for Windows, you can also access the Page Setup menu by clicking the arrow in the bottom right of the relevant section on the ribbon. Margin options available here include:
- Gutter margin size and position – A gutter margin is extra space on the page used for binding. This won’t be necessary for most documents, but you can add one here if required.
- Mirror margins – Selecting mirror margins from the Multiple Pages submenu will change the “Left” and “Right” margin options to “Inner” and “Outer” margins. This ensures that the margins on facing pages are equal if you’re binding something as a book.

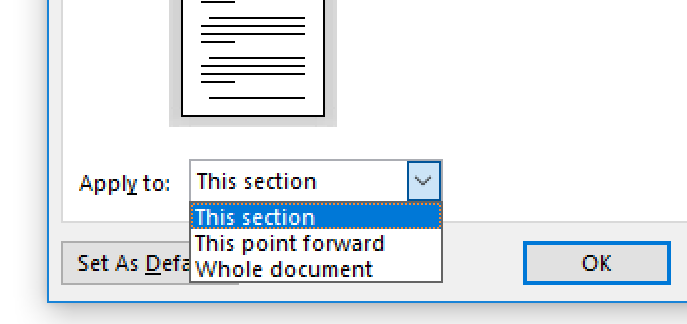
You can also use the Apply To options in the Page Setup menu to control which part of the document you format (e.g., Whole document, This section only, or This point forward). However, you may also want to add your own section breaks for full control over where margin formatting is applied.

Page Orientation
Page orientation refers to whether the document is landscape or portrait. Most documents will be portrait, which is the default in Microsoft Word. But the landscape format can be useful in some cases, such as when a document contains illustrations or charts too wide to fit on a portrait page.
Find this useful?
Subscribe to our newsletter and get writing tips from our editors straight to your inbox.
To adjust the page orientation in a whole Microsoft Word document:
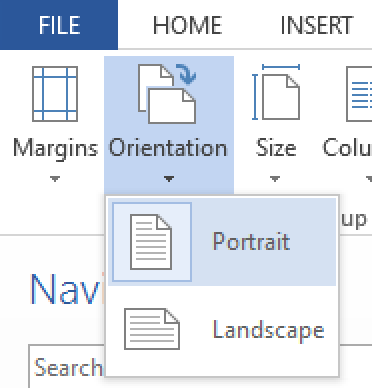
- Go to Layout > Page Setup > Orientation on the main ribbon.
- Select either Portrait or Landscape as required.

To change the orientation of part of a document, you will need to either:
- Add section breaks before and after the section you want to format.
- Open the Page Setup window, select an orientation, and pick which part of the document you want to format via the Apply To menu (as described above in relation to margins).
This will let you present one page in a landscape format (e.g., to fit in a chart). But make sure to add section breaks before changing the orientation.