• 3-minute read
  • 21st December 2018

How to Create an Index in Microsoft Word

Have you ever wondered who compiles the indexes at the end of books? Traditionally, this has been a specialist profession. However, these days, you can add an index to a document yourself. In this post, for example, we’re looking at how to create an index in Microsoft Word.

When to Add an Index

Most documents don’t need an index. In fact, it is usually only book-length non-fiction that does! And even if you are writing a non-fiction book, indexing is often handled by the publisher.

However, if you want to self-publish a work of non-fiction – or if you are creating another long document such as a company handbook – you may want to add an index yourself. And this is where the indexing options in Microsoft Word become very useful. This process involves two steps:

  • Marking terms that you want to appear in the index
  • Generating the index itself

We’ll now look at how to create an index in more detail below.

How to Mark Entries

Most of the work of creating an index comes with marking text. This means going through the document to look for terms you want to include in the final index. To mark an entry:

Find this useful?

Subscribe to our newsletter and get writing tips from our editors straight to your inbox.

  • Use the cursor to select the word/phrase you want to include in the index
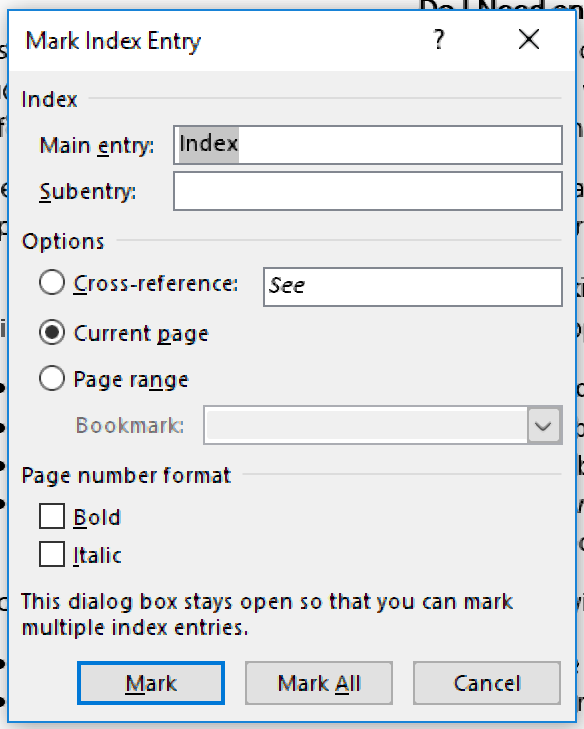
  • Go to References > Index on the main ribbon and click Mark Entry
  • In the new dialogue box, select the options required
  • Click Mark to mark the term selected or Mark All to mark every use of the term throughout the document
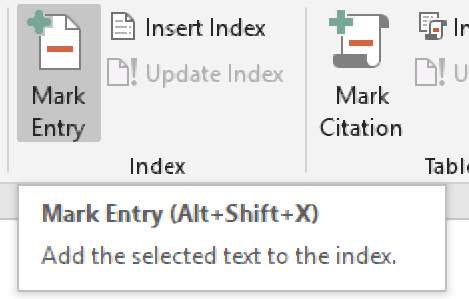
Marking index entries.

The options in the Mark Entry dialogue box mentioned above will let you:

  • Link a Subentry (i.e., a similar term) to the main term
  • Cross-reference a term with another index entry
  • Control the page number format
Index entry options.

Make sure to do this for every term that you want to include in the index. If you need to “unmark” a term, you will first need to turn on hidden text in Word. You will then be able to see, and if required remove, the index entry in curly brackets. Make sure to do this for all similar entries.

A marked entry field.

How to Create an Index

Once you have marked your entries, all that’s left is to create an index:

  • Place the cursor where you want to create an index
  • Go to References > Index and select Insert Index
  • Select any required formatting options from the menu
  • Click OK to insert an index in the selected location
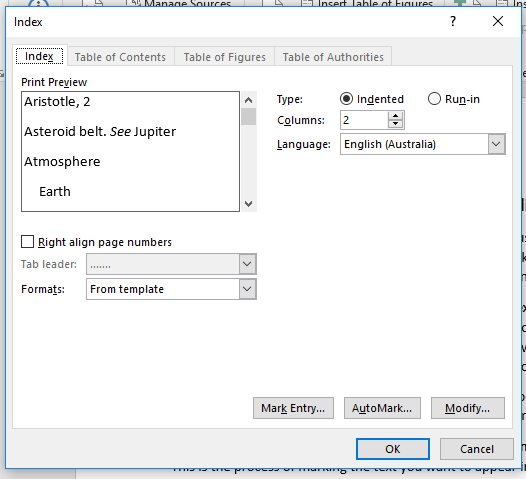
The index menu.
The index menu.

Microsoft Word will generate an index based on your marked entries. If you change any of the marked entries, you can then update the index at the click of a button by going to References > Index > Update Index.

Comments (9)
Igor Borshcher
9th November 2019 at 13:32
when I open 'insert index' dialog box all but 'index' options aren't active, and when I try to put in column something else but 'auto', OK button turns inactive
    Proofed
    9th November 2019 at 14:16
    Hi, Igor. Can you clarify your question? I'm not entirely sure what the issue is. However, it is normal for the other tabs to be inactive (there are separate buttons for the table of authorities, contents, etc.). I'm not entirely sure what the "column" problem is, though, as you should be able to enter a number between 1 and 4 in that box in the index menu (or use the arrows to select a number of columns).
Blasius Achiri
29th August 2020 at 14:58
Please, how do I dismiss the markings in the text after creating and inserting the index?
    Proofed
    31st August 2020 at 12:21
    Hi there! You should be able to hide the marked entry fields (and other hidden formatting) using the "Show/Hide" button. This should be visible in the "Paragraph" section of the "Home" tab on the ribbon (a symbol that looks like this ¶).
Snowye
21st December 2020 at 21:59
When I "insert index" using 2-column, the entries go back and forth horizontally across the columns instead of vertically, with the overflow from the first column then starting on the second column. Is there a a setting/fix for this? Thank you for being here :)
    Proofed
    22nd December 2020 at 09:20
    Hi there. I'm afraid I'm not entirely clear on what you mean without seeing the document. With the two-column option, the default should be an A-Z listing, starting with "A" words (or the earliest in your list) at the top of the first column and continuing down, ending in "Z" words (or the latest in your list) at the end of the second column. There are some options for formatting these lists (e.g., fonts, indentations), but I don't think there's a way to change their order or direction. You can override the sorting for individual entries by editing the markup in the main document, but doing that for the whole list could take a long time!
GRIFFITH B HABER
25th March 2021 at 16:13
When I have marked several items for the index, my picture and picture caption format in the document is all messed up. What can I do to prevent that from happening?
    Proofed
    25th March 2021 at 17:03
    Hi, Griffith. I'm afraid it's very difficult for us to offer advice without seeing the document. Have you tried using the option to display hidden text so you can see if the markup is going wrong somewhere? If you can describe the issue in more detail (e.g., how things have been "messed up"), we might be able to offer some advice, but indexing shouldn't affect images or captions unless you're applying markup to them directly, so it sounds like it could be a bug (in which case you might need to try Microsoft support instead).
GRIFFITH B HABER
25th March 2021 at 21:24
Thanks for your response. I can see the markups and they seem to be correct and when I create an index it works okay. To be more precise, the photos and captions are moved from their previous location. The captions are no longer under some of the photos or they are a few lines up or down from where they were before, sometimes on the next page. I have both set to move with text, that didn’t work, I tried removing move with text and that made it worse. The anchor box is not checked. It seems that the codes I add when I mark an item (there may be many on the same page) adds more paragraph text and that causes the photos and captions to move too?? Thanks again.


Got content that needs a quick turnaround?

Let us polish your work.

Explore our editorial business services.

More Writing Tips?
Trusted by thousands of leading
institutions and businesses

Make sure your writing is the best it can be with our expert English proofreading and editing.