-
3-minute read
-
7th August 2016
Changing the Language Settings in Microsoft Word
The automatic spellchecker in Microsoft Word is far from perfect, but it can be useful for spotting mistakes in your written work. First, though, you’ll need to know how to change the language settings.
This is vital because even regional variations of English can differ in spelling, which means the automatic spellchecker will miss mistakes if the wrong settings are used. Luckily, changing the language in Microsoft Word is a quick and simple process.
Changing Language Settings
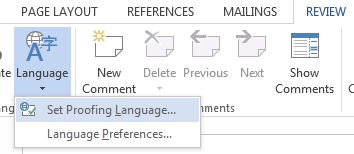
There are two main ways to set the language of a new document in Microsoft Word. The first is to use the “Review” tab on the main ribbon:
- Go to the “Review” tab and find the “Language” section
- Click on “Language” and select “Set Proofing Language…”

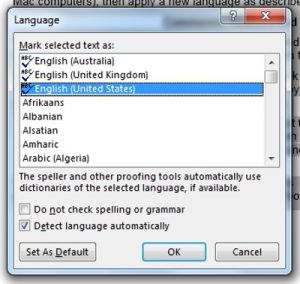
- Choose the language required in your document from the new window and click “OK”

The second option is possibly even simpler:
- Click on the language section of the blue bar at the bottom of your document (this will display the current language settings by default)

- In the new window, select your chosen language and click “OK”
Either approach will ensure the spellchecker looks for spellings specific to your region. For American English, the correct option is “English (United States).” If you click “Set as Default,” the same settings will be applied to all new documents.
Applying a New Language to Existing Text
If you’re applying new language settings to an existing document rather than starting from scratch, you’ll need to select the text you want to modify first.
Find this useful?
Subscribe to our newsletter and get writing tips from our editors straight to your inbox.
Subscribe to Beyond the Margins and get your monthly fix of editorial strategy, workflow tips, and real-world examples from content leaders.
You can do this by selecting the passages you want to check and using the steps outlined above to pick a new proofing language. This also allows you to use different language settings in different parts of the same document, if required.
Alternatively, you can quickly select all of the text in a document using “Ctrl + A” (or “Cmd + A” on Mac computers), then apply a new language as described above.
Comments, Headers and Footnotes
For reasons beyond the comprehension of mortal minds, Microsoft treats the language options for comments, headers and footnotes as separate from the main text in your document.

If you’re using any of these features, you’ll need to check that the language settings are consistent with the rest of your document. You can do this either by selecting the relevant text and using the process described above, or by following these steps:
- Go to “Styles” and right click the style you want to update (e.g., “Header”)
- In the dropdown menu, click “Modify…” to open a new window
- In this menu, click “Format” in the bottom left and select “Language”
- Pick the language required and click “OK”
This will ensure consistency between different parts of the document in question, which is especially important if your paper includes extensive footnotes.


