-
5-minute read
-
16th August 2026
Understanding the Citation Tools in Microsoft Word
The citation tools in Microsoft Word make it easy to add references to your work. Whether you’re writing a report or a research paper, these tools help you manage sources efficiently. This post covers the essentials of adding and modifying citations directly within Word.
Add a Citation in Microsoft Word
Microsoft Word has designed its citation tools for use with referencing systems that use in-text citations and a reference list, such as APA or MLA. If you’re using one of these systems, the built-in tools simplify the process of managing references throughout your document. For information on using footnotes and endnotes in your work, see our guide on footnotes and endnotes in essays.
Here’s how to add an in-text citation for a source:
1. Place your cursor where you want to add a citation
2. Go to the References tab on the ribbon
3. Select a referencing system from the drop-down Style list (e.g., APA)
4. Click Insert Citation and then Add New Source
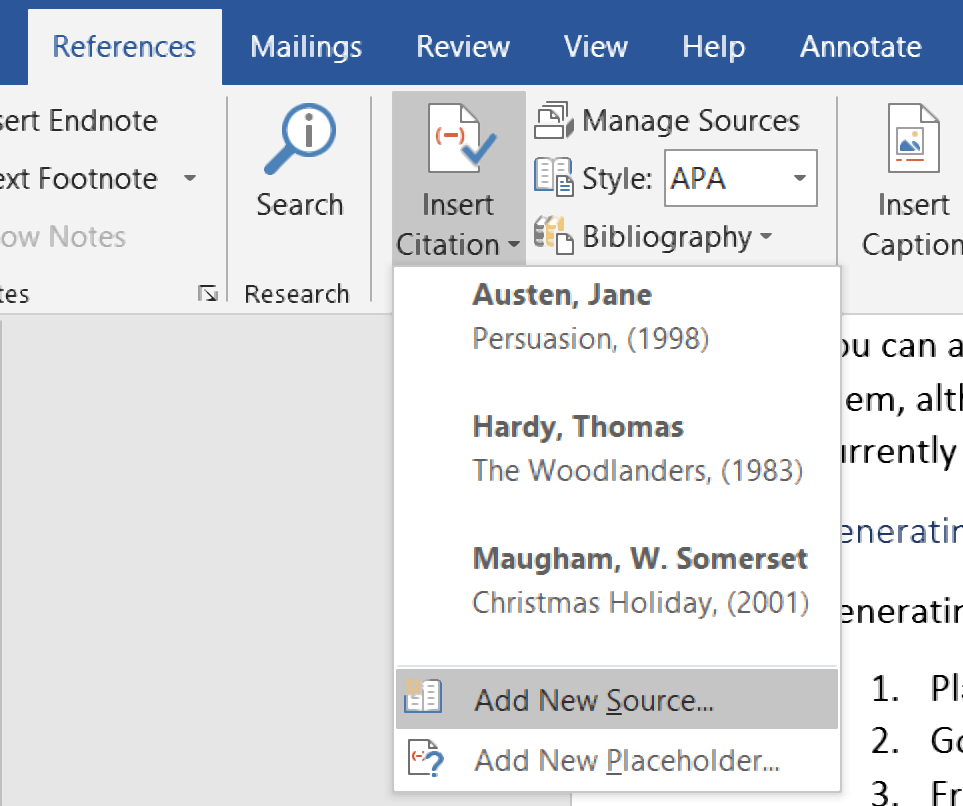
This will open a new dialog box where you can fill in the source details.
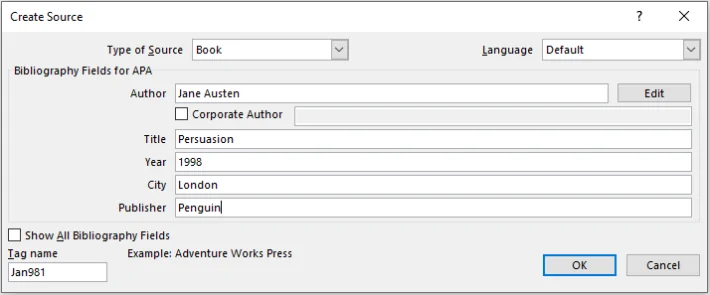
The options in this dialog box should be straightforward. An example appears at the bottom of the window when you click on each field to help you format the source information correctly. For instance, it will show that you need to add a semicolon between author names when a source has more than one author.
For additional options, select Show All Bibliography Fields. This gives you the scope to customize source information further, such as adding volume and issue numbers when citing a journal article.
When you’re done, click OK to add the citation to your document. The citation will appear at the selected location, formatted according to your chosen referencing system.

Cited sources will also appear in the Insert Citation list. To cite a source more than once, place the cursor where you want the new citation. Then click Insert Citation and select the source from the list.
Edit Citations for Accuracy
After entering a citation, you can edit it to add page numbers or suppress certain details. Follow these steps:
1. Click on the citation you want to edit
2. Via the drop-down menu, select Edit Citation
3. Add any required page numbers, or tick any elements you want to leave out of the citation (e.g., the author’s surname)
Find this useful?
Subscribe to our newsletter and get writing tips from our editors straight to your inbox.
Subscribe to Beyond the Margins and get your monthly fix of editorial strategy, workflow tips, and real-world examples from content leaders.
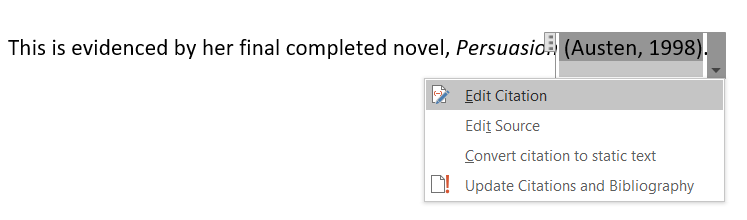
Suppressing part of a citation is useful when you have already mentioned the author’s name in the text. Removing it from the parenthetical citation prevents unnecessary repetition and keeps your writing concise.
If you need to edit other information in your citation, such as correcting the spelling of the author’s name, you can select Edit Source from the drop-down menu instead. This will bring up the dialog box where you initially entered the source details, and you can make any necessary changes to ensure the citation is accurate.
Manage Your Sources Across Documents
If you click the Manage Sources button on the ribbon, a new window will open showing two lists of sources:
- Master list: every source you have added to Microsoft Word’s library, which lets you reuse the same sources across multiple documents
- Current list: all sources cited in the current document
You can move sources between these lists by selecting them and clicking the Copy button. Once you have added a source to the current list, you can quickly insert citations via the Insert Citation list as described above.
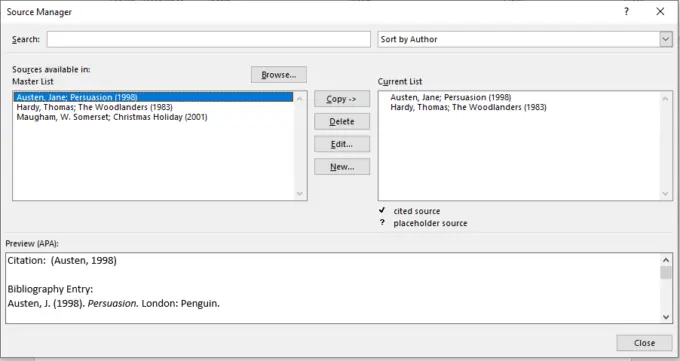
You can also edit source details from this area. You may add new sources or delete existing ones. However, you won’t be able to delete any sources that are actively cited in a document you currently have open.
Generate a Reference List or Bibliography
Generating a reference list is simple if you have used the citation tools throughout your document:
1. Place your cursor where you want the list to appear
2. Go to References > Bibliography
3. In the drop-down menu, select a list format and heading, or click Insert Bibliography at the bottom if you prefer to add your own heading
Your reference list will then appear at the selected location. Each entry will be formatted according to your chosen referencing system.
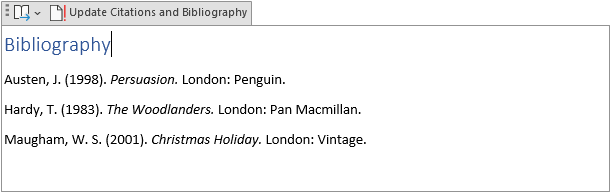
If you add sources after creating your bibliography, click anywhere on the list. You will see an option to Update Citations and Bibliography. This will integrate any new citations into your list automatically.
Proofread Your Citations and References
While the citation tools in Microsoft Word are helpful, they require careful attention. Unless you know your chosen referencing system well, it is easy to omit information from a reference entry or format a citation incorrectly.
Some referencing styles, such as Harvard referencing, have many variations. You need to confirm that your references match the specific requirements of your organization or institution and review your citations thoroughly before finalizing any document.
Consistent and accurate referencing strengthens the credibility of your work. It also demonstrates attention to detail, which matters in professional and academic contexts alike. Taking the time to verify each entry against your style guide can prevent errors that undermine an otherwise strong document.
Getting Help With Your Citations
If you need support with citations or any other aspect of your writing, our expert editors can help. We offer specialized proofreading and editing for Microsoft Word documents to ensure your references are accurate and consistent. Upload your document today at Proofed for Business to see how we can improve your work.